
Ingredients
| HONEY CAKE | |
| 100g honey | |
| 100g brown sugar | |
| 85g butter | |
| 2 eggs | |
| 1 egg yolk | |
| ¾ teaspoon baking soda | |
| 1 teaspoon ground cinnamon | |
| 180g flour | |
| HONEY CREAM | |
| 125g sour cream | |
| 200g cream | |
| 50g honey | |
| 50g mascarpone | |
| ½ teaspoon vanilla bean paste | |
| HONEY CREAM TOPPING | |
| 50g sour cream | |
| 100g mascarpone | |
| 100g cream | |
| ¼ teaspoon vanilla bean paste | |
| 25g honey | |
| TO FINISH | |
| runny honey | |
| bee pollen, gold leaf or edible flowers |
Medovik, also known as Russian honey cake, is a beautiful layered gâteau composed of a honey biscuit/cake and honey cream. A lot of recipes tend to be very complicated, with steps like burning the honey then stirring in the eggs while trying not to curdle them. After a lot of tinkering I’ve managed to make the recipe much less stressful but still equally delicious. The prominent honey flavour is what lands this recipe in the celebrations section, as it is perfect for Rosh Hashanah – Jewish New Year – where we celebrate by eating sweet, honey-flavoured treats. You can use whatever honey you like – keeping in mind that the flavour of the honey will determine the flavour of the gâteau. This recipe is much easier if you have multiple baking tins, but if you don’t it will still work, you just need a bit of patience.
View the recipe collection here
Instructions
| 1. | HONEY CAKE |
| 2. | Preheat the oven to 190°C. |
| 3. | Cut four sheets of baking paper to fit a baking tin 16cm x 26cm and 3.5cm deep and line the tin with one sheet. |
| 4. | If you have more tins line them with baking paper also. |
| 5. | In a pot, heat the honey, sugar and butter together until fully melted. |
| 6. | Remove from the heat and whisk in the eggs, one at a time, followed by the egg yolk. |
| 7. | Whisk in the baking soda, cinnamon and flour until you have a thick batter. |
| 8. | Weigh 110g of batter into the lined tin and spread into an even layer with a palette knife. It will be very thin. |
| 9. | Bake for 4–6 minutes, until lightly golden, slightly puffed and just set to the touch. |
| 10. | Remove from the oven and from the tin, and repeat with the remaining batter. |
| 11. | You need four cakes in total, but you may have enough batter for a fifth, which means you get to eat the extra! |
| 12. | The cake will feel very dry when you eat it, but when it absorbs the honey cream it’ll be perfect. |
| 13. | Set the cakes aside to cool completely before starting the honey cream. |
| 14. | HONEY CREAM |
| 15. | Line the tin with a fresh sheet of baking paper. |
| 16. | Whip everything together until it forms soft peaks. |
| 17. | Place a honey cake in the base of the prepared tin. |
| 18. | Spread 140g of honey cream on top and level off with a palette knife. |
| 19. | Top with another sheet of cake, followed by another layer of cream, repeating until you have four layers of cake and three layers of cream. |
| 20. | Cover with cling film and refrigerate overnight. |
| 21. | This step is super important as it will soften the cake and allow it to absorb moisture from the cream. |
| 22. | You can refrigerate it for up to 3 days before portioning. |
| 23. | PORTIONING |
| 24. | See Techniques section (here) on how to portion your petit gâteau. |
| 25. | Portion the gâteau into 24 pieces that are 4 x 4cm squares. |
| 26. | Store in the fridge before finishing. |
| 27. | HONEY CREAM TOPPING |
| 28. | Whip everything together until stiff peaks form. |
| 29. | Spoon into a piping bag with a 1cm round tip. |
| 30. | Pipe one large kiss on top of each gâteau. |
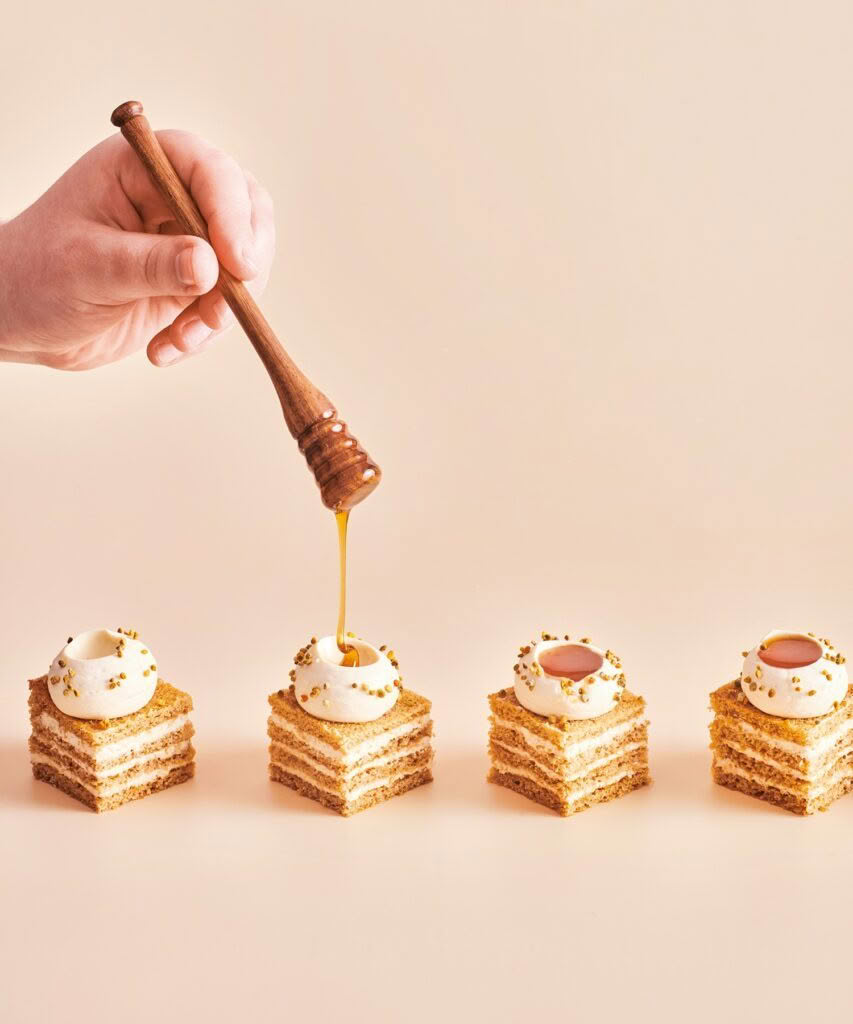
| 31. | Use a round tablespoon measure to create indents in the cream – dip the spoon into hot water, shake the water off and then press the rounded base of the spoon into your kiss. |
| 32. | Once your cavity is as deep as you’d like, gently slide the teaspoon measure out in an upwards motion, leaving you with a smooth, perfectly round indent. |
| 33. | TO FINISH |
| 34. | Pour some honey into a piping bag and fill the indents of the cream to just below the top with the honey. |
| 35. | Decorate with bee pollen and serve. |
| 36. | If you can’t get bee pollen you can use a little gold leaf or some edible flowers instead. |
 Pâtisserie Made Simple:
The Art of Petits Gâteaux,
by Maxine Scheckter,
photography by Amber-
Jayne Bain, published
by Bateman Books,
RRP $69.99. Release
date March 2025.